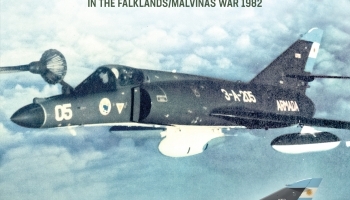
Review: Handbrake! – Dassault Super Étendard Fighter-Bombers in the Falklands/Malvinas War 1982

Sometimes a book catches you by surprise. When Helion reached out and asked if I would like to review a title or two for them, I jumped at the occasion to sink my teeth into “Carrier Killer – China’s Anti-Ship Ballistic Missiles and Theater of Operations in the early 21st Century” by Gerry Doyle and Blake Herzinger. However, Helion offered two books, and among the titles on offer was also “Handbrake!” by Alejandro Amendolara and Mariano Sciaroni (ISBN: 9781915070722), dealing with what probably is the most well-known system of the Falklands War: the Super Étendard and its fearsome Exocet missile. In a change of plans, I will review the latter now, because I believe that the majority of those interested in the rather niche topic of Chinese ballistic anti-ship missiles will by now already know that Doyle and Herzinger has written an excellent book on the topic, and instead I will focus on “Handbrake!” which was a pleasant surprise.

(I will be using the standard English name throughout this text, largely due to using both in running text being unwieldy and since the name Falkland Islands is standardised in English).

Now, the Falklands War has been a personal area of interest for me for decades, as it in many ways combine my core interests of naval, aviation, and amphibious operations in a package held together by huge personalities, improvisation, bravery, and a serious amount of ‘can do’-attitude on both sides of the conflict. That was also why I was somewhat sceptical of how much new the book would bring, as I felt I had a rather good picture of the topic, and my fear was that dedicating 98 pages to what amounted to three missions actually seeing missiles fired would either just repeat the well-known story or go into tiresome minutiae. Fortunately, I was wrong.

The book starts with an overview of the Super Étendard and the AM39 Exocet, followed by a brief history of the Segunda Escuadrilla Aeronaval de Caza y Ataque (the Second Naval Fighter and Attack Squadron) of the Argentinian Naval Aviation. This then continues on to the chronology of the acquisition of the aircraft, the training of the pilots, deliveries, and how the IOC to FOC program was set up in Argentina. As is well-known, that nice plan was cut short by the war.

The book include aircraft details for all missions flown, good illustrations, and several eyewitness accounts interspersed throughout.

The book discusses the integration work, development of tactics, and the infighting and politics surrounding the usage of the unit – with both the Air Force and more surprisingly the Naval leadership showing surprisingly poor understanding of the capabilities and limitations – before discussing the history of the unit in the war with a focus on the missions flown. It manages to go into detail while still being a very readable text. It also include ample personal accounts not only from the 2de Escuadrilla, but also from those supporting the missions such as the SP-2H Neptune unit as well as from the UK side of the attacks. The last part of the book briefly look at the history of the unit and their aircraft following the war.

As said, while I felt I had a quite good grasp of the situation, but there was still ample detail throughout which were new to me. I knew there were challenges with the integration of the missiles, but the book opens up the nature of these and how they were overcome. In the same way, while I knew the Neptunes were old and worn, it is only after reading “Handbrake!” I understood the nature of these problems and why it wasn’t possible to push them just a bit harder considering it was war. The maps drawn for this book are also among the very best I’ve seen related to not just these strikes but air war in general, capturing not only the facts, but also taking care to point out radar contacts and timestamps which might or might not have been correct, something that makes it possible for the reader to follow not just what happened, but what the people involved in the fighting thought was happening. It is also the most detailed description of the controversial 30 May strike directed against HMS Invincible I’ve come across, and here as well we have not only the classic “they flew this route”-map, but also a detailed look at the Task Force and what was going on inside it during those hectic minutes.

This was my second Helion-book (after “Carrier Killer”), and as said I was positively surprised and impressed by the quality of the book throughout. The writing is excellent, the balance between the eyewitness accounts and the more objective narration that forty years of hindsight provides is spot on, and as mentioned the illustrations – including photographs, colour profiles of the Super Étendards, an SP-2H Neptune, one of the units earlier T-28P Trojans, a Dagger A, a KC-130H, an A-4C Skyhawk, and HMS Sheffield, and the excellent maps – are top notch. Working in the field professionally, I will say that the decision to allow the maps to be a bit cluttered in order to provide more information than what is usually the case was a true home-run.

One of many excellent maps, including plenty of details and timestamps to give a good picture of not only what happened, but what the people involved thought was happening.

If you are looking for what just might be the definitive account in English of the Super Étendard operations in the Falklands War, this might just be it. The only thing related which I feel might have been of value to include would be a brief account of the single land-based missile attack on HMS Glamorgan to cover all Exocet-launches, but the book is clearly written around the Super Étendard and the men surrounding the aircraft so I understand that decision – the Glamorgan-attack really doesn’t have any connections to the other besides the weapon used.

I will note that if you are new to the Falklands War, you will probably be better served by some broader work to begin with, to be able to fit the story of the five missile launches into the wider picture. However, if you like me have an unhealthy obses…, ahem, keen interest in the conflict, the book is an excellent addition to any bookshelf. Highly recommended.

The book was provided free of charge (except custom duties which I paid myself) for review by Helion.

The Junkers of Aakenustunturi

Today Ylläs is known as one of the larger tourist destinations in Northern Finland. The twin villages of Äkäslompolo and Ylläsjärvi play host to a number of visitors coming there to ski cross-country and alpine in winter, and to hike, mountainbike, and pick cloudberries in the summer. Those wanting to experience the wilderness usually strikes out to the northeast, where the landscape is dominated by the seven fells that have become the hallmark of the region. Furthest away is the mighty Aakenustunturi. While not among the highest, it still reaches well above the treeline, and stretches in a long horseshoe-shaped pattern with three distinct peaks – Vareslaki (north), Moloslaki (east), and Totovaara (south). In the summer hiking routes starting from the nearby Ylläs-Kittilä road makes ascents relatively easy provided you have the proper footwear, while a more demanding alternative is to hike or ski from Äkäslompolo. This blog usually doesn’t deal with outdoors life, but studying the maps you might notice the somewhat unusual name Lentokonejänkkä (Fi. the aircraft fen) for a small marsh just below Moloslaki.

In the early days of 1944 the region was very different. Neither Äkäslompolo nor Ylläs had a road connection (which was a blessing in disguise as the villages were spared destruction during the German retreat the following fall). And on the first of February that year, Aakenustunturi would see one of the many small tragedies that the war was full of.

The remains of ‘P4+CH’. Note the radiator belonging to a Bf 110 in the foreground, part of the fateful cargo. Source: Own picture

Germany was handling the northernmost part of the Finnish frontline, leading to a supply line stretching over the Baltic Sea and through Finland up to the Norwegian coastline and the Barents Sea. The main Finnish city in the region, Rovaniemi, became a logistics hub with its own transport aircraft unit. This was the Transportstaffel/Fliegerführer Nord (Ost) sorting directly under Luftflotte 5, and sporting the unwieldy abbreviation Tr.St.Fl.Fü.Nord (Ost). Further to the east and close to the frontline in White Sea Karelia (Fi. Vienan Karjala, Ru. Belomorskaja Kareliya), the airfield of Pontsalenjoki was found. Little more than a clearing in the forest, the field spent the war seeing small detachments of fighters, ground support, and reconnaissance aircraft rotate in and out according to need. It was from here that Junker Ju 52/3m ‘P4+CH’ from Tr.St.Fl.Fü.Nord (Ost) took off loaded with a cargo that included spares for Messerschmitt Bf 110 heavy fighters and mail. The crew of four was made up of oberfeldwebel Kurt Rochna (pilot), unteroffizier Karl Meyer (radio), unteroffizier Stephan Kulin (mechanic), and unteroffizier Willi Brade (rear-gunner), and the plane set course towards Rovaniemi. Someone from the crew also brought along a dog.

A Spanish-built Junker Ju 52 (locally designated CASA 352) warbird showing how the typical ‘Tante Ju’ looked like above the Eastern Front during WWII. Note the gunner’s position towards the rear of the aircraft. Source: Mike Freer – Touchdown-aviation via Wikimedia Commons

We don’t know at what point the crew realised that something was wrong, but the weather over western Lapland was poor that day, and what should have been a routine 250 km trip ended on the eastern slopes of Aakenustunturi 140 km north of their intended destination. It is possible that Ofw. Rochna made a desperate attempt to ditch the aircraft having run out of fuel and options. The large open wetlands west of the fell would have been a better option in that case, but with poor weather and most likely little to no daylight he might have misjudged the white silhouette of the fell until it was too late to change their course of action. In any case the aircraft came to a stop in the snow on the eastern slopes of Moloslaki relatively intact, with bent propellers and the fixed undercarriage torn away. However, the force of the crash was still hard enough that part of the cargo broke loose and came forward, crashing through the thin cockpit wall and instantly killing everyone except Uffz. Brade who was seated further back in the aircraft.

The story about what happened next is a mixture of deduction by those that eventually found the wreck, rumours, and local legends with a hint of horror stories, making it difficult to piece together for certain what actually happened. What seems to clear is that Brade was seriously injured, and could not leave the wreck. In February the snow can easily be more than a meter deep, and trekking through the wilderness without proper equipment is difficult even for a fit and healthy individual. It is also unclear if he knew where the aircraft had crashed. Brade did have a signal gun and during the night he fired an unknown number of flares. The crash location was above the treeline, and with both the village of Kittilä and, crucially, the German air observation post at Levi within 20 km one would be forgiven to think that he might have had some luck with his distress signals. That was however not to be the case. Reportedly some locals in Kittilä saw the signals, but are said to have chalked the lights down to stormy weather coming in over the fell. In any case no one felt the need to report the observation onward to the authorities.

A piece of the wreck still showing traces of the paint layers despite eight decades of the sun and snow having taken their toll. Source: Own picture

At Levi the situation was none the better, and despite there being a clear line of sight between the two fells none of the signals were observed. According to the most likely explanation the air observation post was simply unmanned due to the poor weather convincing the crew there that no air traffic would take place. In the more grim version told by the locals, the soldiers had started partying, and in the alcohol-fuelled excitement they hadn’t noticed the signals. According to the same tale, they had all been executed afterwards.

In any case, Brade was out of luck, and would not leave the wreck alive. The German search effort was hampered by the poor weather, and failed to locate the Junkers. The next confirmed information is that a Finnish anti-partisan unit based in Kittilä encountered the wreck by chance when out on a trip in April the same year. According to the local horror stories, Brade would have struggled for days, keeping a diary written in his own blood, until eventually succumbing to a combination of his injuries and the harsh conditions. Local reindeer herders would have found the wreck, but as there was a sizeable amount of cash in it they made off with the money and kept their mouths shut. However, staff sergeant Armas Salovirta, second in command of the Finnish company stationed in Kittilä and leader of the group that found the wreck, wrote about the event in the late 80’s to try and kill some of the more spectacular rumours.

Bundesarchiv Bild 101I-382-0211-22, Flugzeug Messerschmitt Me 110.jpg
A Bf 110 at the Western Front. Note the underwing radiator just outside of the engine. Source: Bundesarchiv via Wikimedia Commons

According to him, the unit was out as part of a physical education drive when they from far away spotted a dark spot on the eastern slope of the fell. Having nothing better to do, they decided to head over there to check what it was. Seeing it was an aircraft, they approached and peered into the rear compartment through one of the intact windows. There they saw Brade’s body, and a “hairy thing” that they figured was a wolverine. Equipped with an axe, Salovirta then opened the door to the cargo space, and was greeted by a rather aggressive long-haired puppy. The dog was however quickly won over by a piece of bread. After this, Salovirta and his men checked the cockpit and found two mutilated bodies described as the pilot and co-pilot crushed by the crates of aircraft spares. Apparently they did not notice the body of the fourth crew member, probably belonging to the radio operator Uffz. Meyer and seated immediately behind the cockpit. It is likely that at this point he was buried under the same crates that had killed Rochna and Kulin.

Having not expected to find an aircraft wreck, the patrol was poorly equipped to retrieve anything larger than what went into their backpacks. As such, the mail and puppy was packed into their bags, together with a pair of meal packages (one of which was opened and eaten on the return trip). The fact that these were still left in the aircraft shows that Brade most likely didn’t have time to starve before a combination of his injuries and the cold weather got the better of him. Salovirta noted that he indeed seemed to have survived for several days, but denied there being any kind of diary markings (in blood or otherwise) at the crash site. After Brade’s death, the dog had started to eat him, which explained how it had survived alone for over two months. Back in Kittilä the findings were reported up the Finnish chain of command, and the message about the lost aircraft finally reached the Germans. The thankful Germans gifted the puppy to Salovirta, who named it Junkers after the aircraft. Whether the aircraft had been visited before Salovirta’s patrol will likely remain a mystery, but the presence of the dog inside the wreck would indicate that the story of the herders is a myth.

About a week after the wreck had been located a group of German mountain troops, probably either of the 2.Gebirgs-Division or 6. SS-Gebirgs-Division “Nord”, arrived in Kittilä and requested to be shown the wreck. Salovirta accompanied them to the crash site, but the skiers didn’t do much else than observe the location. A short while later German troops came to recover the bodies together with some radio and navigational equipment, before they blew the aircraft to bits.

The trail is well marked, but the trailhead isn’t one you stumble upon by accident. Source: Own picture

Thus ended the sad story of ‘P4+CH’ (WNr. 5049) and its crew. Despite the destruction wrought by the German charges, the wreck is one of the few WWII crash sites in Finland where one can still find sizeable aircraft remains to this day. In the summer, the wreck is a short hike from the Totovaara parking spot, with signs helpfully showing the way towards the “Junkers”. On older maps you will encounter a goahti named Lentokonekota (Fi. the aircraft goahti), but it was burned down by the authorities in 2016 due to it being in poor shape. Continuing onwards past the spot of the former goahti you will encounter the wreck, well visible strewn across the trail. As everything not bolted down has a tendency to wander down the slopes with the melting snow in springtime, I would expect the original crash site to have been higher up on the fell. The hike is approximately 10 km to the wreck and back, but for a truly spectacular walk I would recommend doing the whole Moloslaenkierros which continues onward to the stunning ravine Valokuru, where the trail turns up the fell, before heading back along the ridgeline, passing over the peak Moloslaki before descending back towards the parking spot at the Totovaaran pirtti cabin. From the trail it is possible to see Levi to the north-east, from where Brade’s countrymen failed to spot his flares. Also visible to the east is Kittilä airport built in the late 70’s.

Levi in the distance seen from a spot on Aakenustunturi close to the crash site. Source: Own picture

Remember if you do visit the spot to only take pictures and only leave footprints to ensure that the site remain intact for future. It is also prudent to remember that this is the site where the lives of four young men ended in a foreign land almost eighty years ago. The nature of the war means that their fate largely became just another number in the statistics, but if you find yourself standing at the site of their demise, I ask you to take a moment to remember them.

This retelling is mainly based on Hannu Valtonen’s book “Hylkyretkiä Pohjolaan“, with some additional details added from other sources.

Lessons from History for the Finnish Battlefield

A tweet recently caught my attention.

The basic premise is sound and straightforward, and it is hard to argue with. It also quickly spawned a discussion about which other operations should be included, with some cases more well-known than others.

However, while I personally find the Falklands War very interesting, and while it certainly provide several universal lessons to any student of modern wars, not even an amphibious enthusiast such as myself can deny that from a Finnish point of view (or Swedish for that matter) it most likely isn’t the most relevant conflict to study. Which begs the question, which conflicts are the ones most relevant for an understanding how a war involving Finland would play out?

Having given the question some thought, I have come up with the following list of conflicts I would recommend for study. This is far from an attempt at anything resembling the objective truth on this issue, but rather at providing some food for thought. So, without further ado, here they are:

The Yom Kippur War (1973)

The Six-Day War of 1967 is often portrayed as the pinnacle of Israeli warfighting, and on the surface it’s hard to disagree – beating numerous enemies on several fronts in under a week is impressive, and the more so when looking at the prepared positions and often numerical and/or qualitative superiority of the defenders.

However, the Yom Kippur War on the other hand shows the Israeli way of war when things does not go according to plan. The war kicked off with a two-front assault on the Israelis who were caught off-guard with their reserves unmobilised, leading to a race for the Israelis to bring the brunt of their largely reservist-based Army to the frontlines before the Egyptian and Syrians had advanced too far.

d79ed79cd797d79ed7aa_d799d795d79d_d794d79bd799d7a4d795d7a8d799d79d_d791d792d796d7a8d794_d794d7a6d7a4d795d7a0d799d7aa_d791d7a1d799d7a0d799
The focus on tanks in the IDF following the spectacular successes of the 1967 Six-Day War had left the Israelis with a dangerous lack of infantry and supporting arms once the modern anti-tank guided missiles and rocket launchers made their debut on the battlefield. Source: Israeli Defence Forces Spokesperson’s Unit via Wikimedia Commons

Surprise is one thing. Being caught completely off-guard when it comes to enemy tactics and doctrines is another issue, and one that would cost the Israelis dearly over the coming days. In one of my all-time favourite quotes, Abraham Rabinovich in his excellent overview of the war (simply named “The Yom Kippur War”) wryly notes that:

The Arabs were now doing a lot of things the Israelis had not expected.

The best example is likely that the IDF hadn’t bothered to adress the fact that the Arab armies had superior night-fighting equipment, because based on earlier conflicts it was assumed that they wouldn’t be interested in night-time operations. The same tendency to overlook glaring issues was the reliance on air superiority to offset the lack of artillery, and severely underestimating the influence of modern anti-tank weapons on the battlefield (especially considering how tank-heavy the Israeli Army was).

In the end, however, the IDF proved why it is generally regarded as one of the premier fighting forces in the world. The higher quality of the Israeli soldiers on the individual and small-unit levels started to be felt on the battlefield, and the adaptability and daring ‘can do’-attitude that characterised the IDF throughout the organisation eventually turned the tide. The decision to not try and simply push the two Egyptian armies back over the Suez Canal, but instead strike in the seam between them, cross the canal over to the African side, and completely encircle the Egyptian Third Army (while at the same time having armoured units destroy the SAM-batteries that had been such an issue for the Israeli Air Force) remains among the most impressive post-war operations conducted by any fighting force. It was also marked by the kind of daring-bordering-on-foolhardy planning and stretching-your-luck-almost-(but only almost)-to-the-breaking-point that really spectacular military successes tend to exhibit.

IMG_3029
The memorial overlooking the ‘Valley of Tears’, the battlefield in northern Golan where the Israeli armoured battalion ‘Oz 77’ fought under the command of Lt.Col. Avigdor Kahalani (later brigadier general). This was part of the area identified by Lt.Col. Uri Simhoni as the most crucial part of the front, and where the Syrian breakthrough attempt was denied with the slimmest possible margin. Source: Own picture


One of the key features of the IDF in the Yom Kippur War was the way things just got done. When the war broke out, the command post of Northern Command responsible for the Syrian Front was lacking its commander, his deputy, chief of staff, and the division commanders. Technically that meant that one of the two brigade commanders, Col. Ben-Shoham of the 188th Armoured, was in charge. However, as he was at the front, busy commanding his brigade, the Northern Command operations officer, Lt.Col. Uri Simhoni, figured that he was the one with the best situational picture and the resources to lead the overall battle. As a result, he took charge of what was a command position reserved for a major general, and made the crucial decisions in the early hours of the war that came to shape the fighting on the Syrian front until the ceasefire. This included the decision to commit all reserves to the front from the outset to stop the breakthrough attempts, and identifying the northern flank as the more vulnerable area. To this day it is argued if the decisions were correct, but the notable thing here is that the decisions were made in a position were many other armies would have been stuck waiting without leadership.

The lessons of the conflict include the importance of the speed of decision-making, buying time to get the reserves mobilised, getting the lessons learned at the front transferred to fresh units, and the importance of not underestimating the enemy. The experiences of the war is still reflected in Israeli doctrine to this day, and the reasons behind many of the quirks of the IDF and its equipment is found in the conflict (the most obvious example being the design of the Merkava main battle tank and how it differs from other contemporary designs).

As is often the case, while you can learn from success, perhaps even more can be learned from failure. For the hypothetical “what is the one conflict to study”, I would recommend the Yom Kippur War due to its focus on facing a numerically superior (and partly better equipped) enemy, buying time to mobilise, adapting to the circumstances, the focus on mission command in the IDF, and the text-book examples of how friction affect all levels of fighting a war. However, there are a number of other conflicts that also can provide valuable lessons.

Operation Storm (1995)

When was the last time a large-scale ‘Blitzkrieg‘-style manoeuvre warfare operation was conducted in Europe? Depending on your definition, the answer may vary, but not a few historians have given it as the early days of August 1995. It was then that the young independent Croatian Army launched its last major offensive of the Croatian War of Independence, and completely overran SAO Krajina, the largest of the three regions that made up the self-proclaimed Republic of Serb Krajina.

Following the outbreak of the Croatian War of Independence the Serb regions had declared their own state (largely similar to the situation in neighbouring Bosnia and Herzegovina). As said, the largest of its three regions was the SAO Krajina, controlling large parts of central Croatia, including roughly a third of the border towards Bosnia and Herzegovina as well as isolating Dalmatia from the rest of Croatian territory.

croatian_war_1991_vukovar_destroyed_tank
The locally produced M-84, a Jugoslav version of the T-72, represented the high-end of the armour involved in the conflict. Here a M-84 of the Serb-dominated Jugoslav National Army has hit a mine laid by the Croat defenders during the battle of Vukovar. Source: Peter Denton via Wikimedia Commons

The fiercest fighting of the Croatian War of Independence had taken place within a year of the conflict, with cities such as Vukovar and Dubrovnik seeing heavy fighting before the frontline largely stabilised itself. In 1994 however, the winds began to turn as the Croatian Army was starting to be able to harvest the benefits of years of trying to form the former national guard into an effective fighting force. At the same time the Washington Agreement between the Bosnian Republic of Bosnia and Herzegovina and the Croatian Republic of Herzeg-Bosnia made cooperation with anti-Serb forces across the Bosnian border possible for the Croatian government. The US was also shifting into a position of more openly providing support to the young Croat state, and the scene was slowly being set for a final showdown between the Croats and the Serb Krajina.

During early 1995 it was starting to become clear that the Serbian government in Belgrade was losing interest in supporting the Krajina, and the Croatian Army started moving to recapture lost territory. In May, the most isolated of the three SAO’s, that of Western Slavonia, was quickly overrun in Operation Flash. This was followed by the Croatian Army making smaller offensives to capture strategic staging positions for the all-out offensive against SAO Krajina in the summer, including a push in the south-east on the Bosnian side of the border (the creatively named Operation Summer ’95).

In early August it was then time for the big dance. Bosnian forces in the Bihać pocket tied up the few available Serbian reserves, while Croatian forces broke through weak sectors of the frontline, before continuing at speed deep into the rear of the Serbian region. The stronger Serb positions along the front were simply ignored, and were mopped up later after the strategic goals had been met. The offensive was supported by air strikes and raids behind the lines, with targets including Serbian command and control infrastructure.

The fighting was largely over in just four days, and the effects on the politics in the region were profound. The leadership of the last remaining SAO, SAO Eastern Slavonia, Baranja and Western Syrmia, in the northeastern parts of Croatia realised that the possibility of a Serbian authority in Croatia was largely dead, and would eventually sign the Erdut Agreement transferring the region back into Croatian hands in 1998. The capture of the North-Western corner of the Croatian-Bosnian border also meant that the long siege of Bihać ended, which in turn had a significant effect on the outcome of the Bosnian War. The Serbian population fleeing the Croatian offensive (something that was investigated by the ICJ) also had a significant effect on the internal power balance of independent Croatia.

The Russo-Georgian War (2008)

Studying Russia, really the only potential aggressor in any conflict directly involving Finland, the performance of Russian and Russia-associated units in Ukraine and Syria naturally gets much of the attention. However, there is a strong case to be made that with the exception of equipment performance (a field were several important changes have taken place in the last twelve years) the war in August of 2008 will in fact provide a better baseline from where to begin studies of the modern Russian art of war.

battalion_vostok_3
Close cooperation between infantry and vehicles by Battalion Vostok in South Ossetia during the war. Source: Yana Amelina via Wikimedia Commons

Crucially, the semi-covert nature of the Russian invasion of Ukraine means that a number of high-end features are curtailed, such as the Russian air force and large-scale mechanised units. At the same time, while the Russian invasion of Georgia largely took place before the implementation of the significant reforms of the Russian armed forces, the reforms were heavily influenced by the experiences. Needless to say, when looking at where the Russian armed forces are today and where they strive to be tomorrow, it is of value to look at where they got those ideas in the first place (not unlike the Israeli experience of the Yom Kippur War).

The relative lack of English-language source material and being overtaken by the events in Ukraine and the Middle East has largely left the 2008 war as something of a niche field of study compared to the more recent conflicts. Still, in many ways it is a better representation of the kind of confrontation that is the worst-case scenario for scenario planners around the Baltic Sea.

The Continuation War (1941-1944)

Finland remains Finland, and while much has changed, the experiences during the Second World War still offer many valuable lessons. Of the different parts of the war, the Continuation War is probably the one with most relevance to a modern study, both the Winter War and the Lapland War being serious outliers in many ways.

While much has changed the effects of terrain and climate, as well as the general geography as part of the wider region still remain largely relevant. At the same time, care should be taken not to draw too far reaching conclusions, as the general danger of planning for the last war remains well-known.

Finnish contribution to ISAF (2002-2014)

While Finland remains Finland, and Finnish soldiers remain Finnish soldiers, there’s no denying that Finnish society has seen significant changes in the last eight decades. As such, the combat experiences from Afghanistan can provide valuable input when it comes to identifying the particularities of Finnish soldiers in combat today.

Alexander Karlsson CC Forsvarsmakten FS17 UAV Falken
A Finnish officer looking at the information received from a Swedish ‘Falken’ (Skylark I) light UAS during operations in Afghanistan. The close cooperation between Finnish and Swedish units during a significant part of the Finnish ISAF contribution is likely to have played a part in providing the groundwork for the rapid growth in bilateral cooperation between the countries post-Crimea. Source: Svenska Försvarsmakten/Alexander Karlsson

While Finnish soldiers have taken part in complex peacekeeping operations for the better part of the post-war period, there’s no denying that the operations in Afghanistan are unique both in that they have taken place recently with the very equipment used by the Finnish Defence Forces today, and the fact that the operation eventually evolved into a war. A far cry from the kind of mechanised peer-level conflict that could affect Finland or the general Baltic Sea region, but a war nevertheless.

Significant lessons have been drawn from the conflict already, which have had effects both when it comes to equipment but also to less visible aspects of the FDF. Still, the Finnish ISAF contribution probably remains the premier place to study how modern Finnish units behave and perform in combat, acknowledging the fact that the people chosen for peacekeeping operations and the units they make up aren’t necessarily directly comparable to the average wartime unit and reservist.

Bonus round – Amphibious operations:

It is more difficult to find operations that correspond to the fighting that would take place in the Finnish archipelago, but there are two obvious examples that comes to mind:

The fighting around the Hanko peninsula in the summer of 1941 does provide valuable lessons, especially when it comes to the importance of mobility and securing local superiority, as well as the relative weakness of the defender compared to the attacker which is something that sets archipelagic island hopping apart from normal ground operations.

For the larger operational and strategic levels, the German Operation Albion during the First World War highlights the interplay between naval units, coastal defences, and ground units operating in the littorals, and also offer timely reminders about both the utilities and vulnerabilities of fleets operating in the confined waters of the Baltic Sea. A recent episode of the CIMSEC podcast ‘Sea Control’ is a good place to get a general view of what happened in what was one of the decisive battles of the Baltic Sea theatre in the First World War.

Knight no. 52 – No Bridges Burning

The highest Finnish decoration for military service is the Mannerheim Cross, which was introduced as part of the Knighthood of the Cross of Liberty following the Winter War. A total of 191 servicemen received the order during the Second World War, of which only four received it twice. Of these, colonel Martti Aho spent the last years of his life in my hometown Kokkola, and it is here that he was laid to rest in 1968. The Mannerheim Cross is somewhat unusual in that it can be issued both for exceptional bravery, but also for the conduct of especially successful combat operations, meaning that it was found throughout the ranks of the Finnish Defence Forces, which also was the expressed purpose when the cross was created. Martti Aho’s both crosses belonged to the second category, but that is not to say that he would have been lacking in courage.

Aho was born in 1896 in the countryside outside of Kemi in the northern parts of the country. He begun his military career by volunteering as a rifleman in the Civil War of 1918, where he advanced to squad leader and fought in both his home region as well as in Karelia. Following the end of the war, he joined the unsuccessful Olonets Expedition serving in different battalion and regimental logistics functions, before he returned following the failure of the attempt to extend Finnish rule into Eastern Karelia. It wouldn’t however be the last time he visited the forests of Karelia. Back in Finland, he passed reserve officer training in 1921, and joined the Border Guards two years later. Steadily rising through the ranks, he was swiftly appointed battalion commander once the Winter War started and sent to the Olonets Ishmuts. He ended the war as the commander of Osasto Karpalo, part of the 13. Division, and was wounded twice during the fighting in January and February.

JR. 50:n komentaja majuri Aho neuvottelee saksalaisten upseerien kanssa.
Then-major Aho (second from right closest to the camera) discussing with some German officers in Suvilahti in August 1941. Source: SA-Kuva

The interim peace saw Aho return to the Border Guards where he worked a number of different staff positions and a short stint as a commander of the Border Guard training unit, before he was transferred to the Defence Forces in 1941. When hostilities broke out, he served as the head of operations in the divisional staff of 11. Division, but quickly received command of infantry regiment JR 50, the unit which was to be most closely associated with him.

JR 50 would have an eventful war, and Aho would lead it throughout. Once the offensive east started, the regiment quickly became known for it’s speed and stamina. 19 August the foot infantry unit broke through the enemy positions at Ignoila, despite the Soviet’s having been supported by tanks and direct firing guns, Aho having personally led the offensive from the front of the unit. Having broken through, he pushed onward “skilfully and with ruthless speed”, to use the words of the citation of his first Mannerheim Cross, and captured the strategically important, and hence heavily defended, railway and road bridges over Suojoki before the enemy managed to blow them. Not stopping, he continued in the front, twice having to use his personal light machine gun (yes, that apparently was a thing in JR 50) to chase away enemies from their positions before capturing Suvilahti on the 21 of August. Having appeared in the flank and rear of the enemy position at Näätäjoki, these were forced to retreat with the Finnish forces causing significant losses to the escaping units.

JR. 50 etenee kahlaten vetelällä suolla n. 15km.
Soldiers of JR 50 marching 15 km through the swamps as the operations near Teru commences in the first days of September 1941. Source: SA-kuva

Four days later JR 50 was on the move again, Aho’s regiment first encircling and then crushing the enemy positions at Kurmoila so swiftly that they after this managed to capture the prepared Soviet positions on the hilly Essoila isthmus before they had a chance to man these. This was followed by another short stop, before the unit in early September marched through the forests and swamps around Teru, charged into the position protecting the enemy’s southern flank, broke these, and continued with speed to capture another strategic bridge over Suojujoki before the enemy managed to blow it. He again personally led the first two platoons to cross over. In the end, the successful campaign of JR 50 played a key role in paving the way for the Finnish occupation of Petrozavodsk. This had not gone unnoticed, and Aho was promoted to lieutenant-colonel in October and received his first Mannerheim Cross in March the following year, becoming knight number 52.

The next few years saw limited movements along the front, and JR 50 spent much of the time along the Svir River. When the Soviet summer offensive of 1944 started steamrolling the Finnish positions on the Karelian Isthmus, JR 50 was sent south and met the enemy juggernaut at Portinhoikka during the battle of Tali-Ihantala. Here Aho was wounded the third time, and the regiment suffered devastating losses during the fighting 28 and 29 June. It was then pulled back and placed in reserve for just over a month, before it again was sent to the front in early August. Aho returned to again take command of his regiment on the first day of September, just three days before the armistice. The end of the Continuation War did not spell the end of fighting for the regiment, however.

Everstiluutnantti Aho ja luutnantti Toivonen (JR 50) ovat saaneet rautaristin.
Aho’s achievments weren’t just noticed by the Finnish command. Here he, together with lt Toivonen, has received the German Iron Cross in Kuuttilahti in 1942. Two years later Aho would earn his last victories fighting his former brothers in arms. Source: SA-Kuva

As part of the armistice agreement, Finland was to ensure that the Germans left Finnish territory. The German’s weren’t about to go nicely though, and the Lapland War was the result. On 5 October the regiment landed in Röyttä, the outer port of Tornio, just a short distance from Aho’s childhood home. The fighting had already been going for a few days, and the Finnish forces were hard-pressed to defend themselves against the German counteroffensives. The pendulum was about to swing, however, as more and more Finnish forces arrived. And once again, JR 50 received the order to go on the offensive.

The counteroffensive by JR 50 is probably the second most well-known episode of the battle for Tornio (following the unfortunate episode with the alcohol depot in Little-Berlin). The regiment left much of it’s heavy equipment in Röyttä and marched into swamps and forests through a gap in the front to flank the main German force consisting of three battalions, and encircled them against the River Tornio. While post-war research has shown that significant parts of the encircled did manage to break out, the motti was a significant success and would play an important role in the political games surrounding the Lappland War. Just eight days after the last encircled Germans surrendered, both Aho and his superior major general Aaro Pajari received what in both cases was their second Mannerheim Crosses.

165596
Heavy equipment left behind by the fleeing Germans in the motti north of Tornio. All surviving equipment was sent to the Soviet Union in accordance with the armistice treaty. Source: SA-Kuva

While it can be argued that political considerations weighed more heavily than usual in the decision to hand Aho his second Mannerheim Cross, there is little doubt that he had done more than his share in ensuring Finland’s independence through his participation in four wars. After the war, he spent six weeks arrested when the plans to hide weapons caches in anticipation of a Soviet invasion. Following a few more years in uniform, he retired from active service in 1949.

At this point, he moved to Kokkola and worked at the local stevedoring company until his retirement, also owning a share in it. Today, a commemorative plaque of the double-knight was unveiled at the offices of Rauanheimo, the company still continuing the same line of trade under the original name in the port of Kokkola. Considering his long and remarkable career, it does feel overdue to see him memorialised in his final home town.

Mayor Mattila unveiled the commemorative plaque. Source: own picture

As it happens, my grandmother worked at Rauanheimo during Aho’s final years in the company. She recalled that he was ever the gentleman, each morning making a point out of stopping at every desk and wishing everyone a good morning. The personality that had made him rank amongst Finland’s most decorated soldiers did shine through as well. Once the chain smoker occupying the desk opposite of Aho had left the room for a short break when the remnants in the ashtray set fire to the paperwork he had left on the desk. Aho calmly watched flames, until the smoker came rushing back and started putting out the flames, shouting at Aho why he didn’t do something? Aho, without moving from behind his desk, just answered “It isn’t my fire,” and continued to calmly watch the firefighting efforts. For someone who had faced hostile fire in five wars, some scorched paperwork didn’t qualify as a crisis.

9 April 1940 – Reclaiming the initiative

Operation Weserübung, the German surprise assault on Denmark and Norway on 9 April 1940, was in many a resounding German success. This is often attributed to the complete strategic surprise achieved, leaving the Norwegian leadership scrambling to get to grips with the rapidly developing situation, something they never quite succeeded with (the strategically insignificant capture of Narvik being one of few successful Allied offensive operations).

But in this chaos, a few memorable exceptions showed that the commander in the field has the ability to react in time to sudden developments, and even to wrestle the initiative from the enemy.

oscarsborg_fortress_under_air_attack2c_9_april2c_1940
Oscarsborg Fortress under air attack by Luftwaffe bombers on 9 April 1940, after the sinking of the Blücher. Source: Norwegian Defence Forces via Wikimedia Commons

The best known example of this is oberst (colonel) Eriksen, who commanded Oscarsborg Fortress, and whose decision to open fire upon the unidentified warships that sailed past the fortress on their way to Oslo in the early hours of the morning halted the German invasion fleet.

Visst fanden skal der skytes med skarpt!

Sure as hell we’ll use live rounds!

Col. Eriksen when asked if they really were to open fire

A less well-known story, especially outside of Norway, is that of sekondløytnant Hannevig, and his Telemark regiment.

At the outbreak of hostilities sekondløytnant (2nd Lt.) Thor Olaf Hannevig’s only military background came from having passed an eight-month course to get his commission as an officer in the reserve in 1915. By 1940 he was a close to 50 year old business man with interests in such diverse fields as ship-owning, banking, farming and distilleries. On the whole, he was described as a colourful adventurer.

Upon mobilization he reported for duty at Telemark infanteriregiment nr. 3 (Telemark Infantry Regiment no. 3) in Heistadmoen west of Oslo. There he was turned away at the gate, as the regimental commander saw continued resistance as a lost cause. Hannevig, however, refused to give up without a fight, and travelled west to set up defences there. By raiding military depots in the area he acquired (without permission) light arms for his unit, while at the same time he sent out a new mobilisation order through the local constabulary. By mid-April he had assembled and trained a 150-300 men strong force of volunteers in the western parts of the Telemark, defiantly labelling his new unit as the Telemark regiment.

norwegian_army_colt_heavy_machine_gun_at_the_narvik_front
The Colt M/27 was a localised version of the Browning M1917 in 7.92 mm. These were together with 81 mm mortars the only heavy weapons available to Hannevig’s regiment. Source: Wikimedia Commons

Hannevig’s plan was to fight a delaying action, hoping for reinforcements from the west. The first battle of the “regiment” took place at the bridge of Åmot, where it ambushed a German unit on the 21 April. The Germans halted their offensive until 1 May, while waiting for reinforcements which brought up their strength to two battalions. In a series of skirmishes during the following days, the Norwegians incurred further losses to the Germans, while blowing bridges and destroying the roads to slow the attackers.

On 3 May reports of the surrender of the Norwegian 4th Division in Vestlandet brought an end to the hopes of reinforcements, and Hannevig entered into negotiations with the Germans about surrendering. Due to demands that any surrender be unconditional, he instead “disbanded” the regiment two days later, with most of the 75 soldiers left simply reverting to civilian clothes and going home. After this he waited for the German advance to catch up to his position, and on 8 May he surrendered together with a few of his closest men. By then the 28 German POW’s held outnumbered the Norwegians, which consisted of four soldiers (including Hannevig) and six female auxiliaries.

It can be argued that both Hannevig and Eriksen fought in vain. Neither operation had any lasting effect on the campaign, as German paratroopers captured Oslo without the help of the amphibious force and Hannevig’s operation was way too small to have any impact other than dragging two German battalions into an area of secondary importance. However, what both show is the importance of local leadership at all levels taking charge and leading to the best of their ability, especially if there is a general breakdown in communications. In light of the Crimean invasion and the importance placed upon airborne troops and strategic surprise by the Russian Armed Forces, this is still today a valuable lesson for both active duty and reserve soldiers, NCO’s, and officers.

Review: Tornio ’44

The sheer scope of the Second World War means that there is a vast number of less-known operations. Amongst these, the amphibious landing and following battle between the Finnish and German forces in the Tornio area in the autumn of 1944 is amongst the most obscure. The battle was the single most important part of the so called Lapland War, during which Finnish forces drove out the German units from Finnish territory in accordance with the requirements of the Finnish-Soviet armistice signed during the late summer of that year.

165128.jpg
The iconic picture of two Finnish soldiers with their Panzerschreck along the Kemi-Tornio road. Source: SA-Kuva

The battle wasn’t particularly large, none of the individual skirmishes it was made up of numbered more than a few battalions, and was characterised by poor intelligence, a lack of communication, and the general confusion which followed these. The close proximity to the (neutral) Swedish border and the fact that the two sides up until recently had been brothers in arms and good friends also added to the flavour.

A Finnish-Swedish company called Mikugames has created a boardgame to represent the battle. The hex-and-counter style game covers the whole battle from 1 to 8 of October, with the map stretching from Ajos up to Ylivojakkala. The counters are company-sized units, the being printed on both sides, with the second side representing the unit at half-strength.

At first glance, the game looks like your standard run-of-the-mill wargame, with attack factors being summed and ratios being compared, before the dice resolve the outcome. Upon closer inspection it becomes clear that this is only partly correct, and that the game in fact feature a number of novel approaches to capture the unique nature of the Tornio campaign. While ‘flavour’ has a tendency to mean ‘complexity’ in many wargames, in Tornio ’44 the opposite is in fact true, and they instead make the game highly suitable for beginners. This is mainly due to two factors: the pace at which the battle develops, and the fact that this was almost exclusively an infantry affair.

IMG_1746
A German counterattack from the direction of Kemi has managed to recapture parts of Tornio, including the vital supply depot in ‘Little Berlin’. Visible is the sole German tank company, 2. Panzer-Abteilung 211.

When the battle kicks off, very few units are actually on the map, meaning that the first few turns are rather straightforward and let the players build confidence and become familiar with the sequence of play. After this, the scope of the game gradually increases as more Finnish reinforcements are landed and the German command dispatches more units to the area.

The gameplay itself boil down to a few simple mechanics. Each unit is either motorised or not, which affect the cost of it moving through different kinds of terrain. For the combat value, each unit has an attack and a defence value, reflecting that defence is usually stronger than attack. For the supporting units (i.e. artillery and mortars), they instead get a range and support value (representing how hard they hit), as well as a close-defence value, representing how good they are at defending themselves if they get attacked. While all units are correct according to the historical order of battle, you don’t have to worry about whether you are commanding a Waffen-SS mountain company, a bunch of Finnish light tanks, or a second-rate Ersatz unit if you don’t like. For practical purposes, the only differences actually making a difference is their different mobility and combat values. The few exceptions to this rule are the special abilities of engineers to support river crossings (and blow bridges in the case of the Germans), as well as some simple optional rules dealing with antitank and antiaircraft units.

IMG_1751
The engineers of the Gebirgsjäger-Brigade 139’s 17. company tries to blow the large combined rail and road bridge over the Kemijoki river.

Where the game really shines is in the asymmetric nature of the fighting. To reflect the differing goals of the Finnish and German forces, a single point-track is used, where the Finnish player score their victory points, and the German player tries to subtract the Finnish points. The Finnish player gains their points by capturing key areas, inflicting losses to the Germans (preferably after encircling them in a motti), and for any Finnish units exiting the map along the roads heading north. Reversely, the German player subtracts points by recapturing objectives, destroying the bridges over Torniojoki and Kemijoki rivers (with more points being awarded the longer they can wait before blowing the charges), and for any units exiting the board northward during the last two turns.

This creates a set of extremely interesting tactical dilemmas. How long will the German player try and maintain control of the Kemijoki bridge before retreating northwards? The German player will initially have more troops on the board, with the initiative slowly transferring to the Finnish player, so trying to score a few early victories might be tempting. However, as all German losses are scored, being overly aggressive will soon come back to haunt the point-track. The Finnish player in turn has a major choice in deciding whether the troops will land in Kemi (as per the original plan), on Ajos, or at Röyttä south of Tornio (where the landing historically happened). Of these, Kemi is the most centrally located, followed by Ajos, and then Röyttä. This is turn influences how quickly the German command in Lapland reacts to the threat, with the German forces arriving significantly faster if the first two landing spots are used. The Finnish player can thereby determine the pace of the game by controlling the alert level. This can also be changed mid-game, by diverting some of the later waves of Finnish landings to a landing spot with a higher alert level.

165269
Finnish troops in the Kemi skijumping hill watches helplessly as the German troops blow the Kemijoki bridge in the distance, creating an impressive pillar of smoke. Source: SA-kuva

These differing objectives and the steady stream of troops trickling in from different corners of the battlefield create a surprisingly gripping game. There never seem to be quite enough troops to make that last decisive move, and reinforcements can suddenly alter the force balance on a certain part of the battlefield, while a sudden change in weather might delay the Finnish reinforcements for a crucial turn.

The largest single issue I have with the game is probably that in some places the wording of the manual isn’t completely clear, with key words being used before they have been explained. The map is nicely done, but isn’t mounted and feature a number of prominent folds which require some pressure to straighten out. Otherwise the cardboard counters risk sliding around. However, this is usually the case with games at this price point, and an unmounted rolled map (delivered in a tube) can be bought from the publisher for a reasonable price.

Tornio ’44 is highly recommended to anyone interested in the northern front of World War II or looking for a suitable first game to try hex-and-counter wargaming. While designed for two players, it does work well for single-player as well (with the player playing both sides), with only some minor features being absent. If boardgames doesn’t interest you, but the conflict itself does (and you read Finnish or Swedish), Mika Kulju’s book on the battle is probably the authoritative work on it, and is well worth a read.

Kevyen osaston polkupyöriä lastataan laivaan Tornioon vietäväksi.
The Finnish Light Detachment (Kevyt osasto) load their bicycles onto a Finnish steamer in the port of Toppila, Oulu. Ironically, next to Toppila is the Alppila district, named after the large depot the German mountain troops created there. No ‘real’ landing tonnage was available, and the Finnish troops were ferried by civilian merchant vessels. Source: SA-kuva

The Battle of Schmarden

The skirmish of Schmarden was one in a long line of battles fought along the eastern front during the First World War. Like countless other battalion-sized operations, it would probably have slipped into total obscurity, if not for the fact that the German Landwehr Bataillon that conducted the attack was reinforced by the Pionier Kompanie of the Königlich Preussisches Jägerbataillon Nr. 27.

Just south of Schmarden, today’s Smārde in central Latvia, the Russian troops had managed to create a forward line of defenses that extended close to the German lines, and a decision had been made to perform a nighttime attack to destroy this forward line. A German battalion of reserve infantry would perform the attack in two waves, with the first wave capturing the target and moving up 500 meters past it, in order to let the second wave destroy the fieldworks. After this was done, all German troops would then withdraw back to their starting position.

jaakaripataljooa_libaussa
The pioneer company parading during the summer of 1917. The officer riding on horseback is the German lieutenant Basse, who commanded the company during the battle at Schmarden. Source: Wikimedia Commons/Unknown

To facilitate the destruction of the fieldworks, it was decided that combat engineers were needed, and it so happened that nearby the 27th Royal Prussian Jäger Battalion had a company of engineers grouped as the battalion reserve. This unit was made up of Finnish volunteers, who had managed to leave the Russian Grand Duchy of Finland in order to reach Germany and get military training there. This was all done in anticipation of the coming War of Independence. The members of the battalion, simply called Jääkärit in Finnish, came to provide the core of the ‘White’ Finnish Army in the Finnish Civil War of 1918, and several of the key officers in the Finnish Army during the Second World War had received their training in the clandestine battalion. As such, the importance of the battalion for the development of the Finnish armed forces is hard to overstate.

In July of 1916 the infantry component of the battalion was responsible for a rather calm stretch of the frontline in today’s Latvia, but the engineers had been held in reserve and hadn’t seen any real fighting. The attack near Schmarden would be their baptism of fire. Probably due to this, the company would not operate as a whole unit, but the engineers were attached to German squads either in pairs or in small groups of three. Exactly a hundred years ago, at midnight the night between the 24 and 25 of July, the troops started moving.

While the sky was relatively dark, the tall vegetation in no-man’s land meant that the Russian sentries was alerted by the sound of troops moving, and soon the advancing forces were fired upon by not only rifles and machine guns, but heavy weapons and artillery as well. Despite this, they managed to press on, and soon reached the first line of defences. These were relatively lightly defended, but when moving up the additional 500 meters they met harder resistance in the main and rear trenches.

frontabschnitte_1916_u-17
A map of the the movements of the battalion during its stay at the frontline in 1916-1917. The battle of Schmarden took place at no.2. Source: Jaakko Suomalainen/Wikimedia Commons

The battle as a whole was a rather messy affair, with the advancing troops becoming split up and intermixed. It also seems like the Russian positions weren’t completely destroyed, and the withdrawal was complicated by both Russian and German artillery targeting the no-man’s land. According to the battle reports, the Finnish engineers had by and large shown great courage, and five of the sixteen Russian prisoners of war captured were captured by the Finns. However, it was also reported that in the heat of the battle some had forgot that their primary task was the demolishing of the Russian fortifications, with the Finns at times having advanced in front of the German infantry, and some even ditching their shovels to be able to keep up with the more lightly equipped infantrymen! Still, the general consensus seems to have been that the engineers performed well for being completely ‘green’, and Lt.General Wyneken is said to have thanked the Finns for their part in the fighting.

Unremarkable as Schmarden was, the total losses for the Finns were two soldiers killed in action and a further seven suffering minor wounds, it marked the first time since 1809 that a Finnish combat unit had taken part in an attack against a Russian force on the battlefield. It was also destined to remain the single major offensive operation undertaken by the 27th Jäger Battalion. Schmarden Day is today each year celebrate on the 25 of July as the service branch day of the Finnish combat engineers, so happy Schmardenin päivä to all my pioneeri readers!

The description of the battle is largely based on this text on from the homepage of the Ostrobothnian Guild of Combat Engineers. 

Spitfire vs. Messerschmitt Bf 109

And now for some out-of-schedule aviation geekiness:

Yesterday I encoutnered an off-hand comment about whether the Spitfire or the Messerschmitt (understood to be the Bf 109) was the superior fighter. This is a matter of debate that arises any time aircraft aficionados gather, but it’s Saturday, and I’m slightly bored, so I feel for writing something lighter.

The aircraft that came to be the Supermarine Spitfire was the brainchild of R. J. Mitchell, a talented engineer that had designed some of the most iconic racing seaplanes of the interwar years. Willy Messerschmitt’s bird had a rather different background, with Messerschmitt learning the trade by designing sailplanes. Much (too much) has been made of these different pedigrees, and how they shaped the fighters that came to be. Still, both designs had much in common, being powered by large liquid-cooled V-12 piston engines, relying on all-metal monocoque structures, and having a single low-slung set of wings. In fact, the Spitfire and the Bf 109 were amongst the first mature fighters to discard the biplane design in favor of the single low-mounted wing that has since dominated the world of fighter aircraft.

Spitfire Mk I being rearmed during the height of the Battle of Britain. Source: Wikimedia Commons

The engines of the aircrafts deserve a closer study, as these played an integral part in the development of both series. The Messerschmitt prototype flew with a rather unlikely powersource, namely a British-made Rolls-Royce Kestrel. In the early pre-war versions of the Bf 109 this was then replaced with a Jumo 210 V-12 engine (Jumo standing for Junkers Motoren), but by the time the war broke out the E-version of the Bf 109 had introduced the excellent Daimler-Benz DB 601. By mid-42 a further upgraded version of the DB 600-series had been launched in the form of the DB 605. This would then power the two final versions of the Bf 109, namely the Bf 109G ‘Gustav’ and the Bf 109K ‘Kurfürst’.

The Bf 109E ‘Emil’ of Battle of Britain-fame, here in Swiss colours. Source: Wikimedia Commons/Sandstein

Compared to the Bf 109, the Spitfire had a more straightforward development, with the engine forever associated with the aircraft being the Rolls-Royce Merlin. This powered the prototype (as well as the early Spitfire Mk I in the Battle of Britain), and in refined form it powered the Mk VIII that roamed the skies of Burma in 1945. In parallel, a number of late-war Spitfire variants were also powered by the markedly bigger Rolls-Royce Griffon.

It is easy to overlook exactly how huge these improvements were. The Spitfire Mk I that went to war in 1939 featured a Merlin II, giving it 775 kW of power for a top speed of 580 km/h. The aircraft was armed with eight light machine guns in the form of the 0.303 Browning (7,7 mm). Only four years later, the Merlin 60-series (61, 63 and 66) gave Spitfires of the marks VIII, IX and XVI some 1280 kW of power, for a top speed in excess of 650 km/h. The armament consisted of two 20 mm cannons backed up by two heavy .50 calibre machine guns (12,7 mm), and for ground attack up to 450 kg of bombs could be carried. This remarkable increase in power and speed was taken even further by the late- and post-war Griffon-engined versions, in which the final version of the Spitfire, a carrier-based version named Seafire F.Mk 47 mounted a 1752 kW Rolls-Royce Griffon 88 driving a contra-rotating prop, propelling the aircraft to a top-speed of almost 730 km/h! In the meantime, the Bf 109 had progressed from the pre-war Bf 109A ‘Anton’ with its 493 kW Jumo 210D to the Bf 109K-4 ‘Kurfürst’ featuring a Daimler-Benz DB 605DC with a boosted output of 1470 kW.

The sleek lines of the Griffon -powered Seafire F.Mk XVII, one of the last variants of Mitchell’s classic fighter. Source: Wikimedia Commons/Adrian Pingstone

Herein lays the true remarkability of the aircrafts, the fact that they could take on ever larger amounts of power, and still maintain their fighting capability. Extremely few front-line aircraft stayed in production throughout the Second World War, and both the Spitfire and the Bf 109 belong to this exclusive club.

A classic picture of a Bf 109G-2 ‘Gustav’ in Finnish service. Source: Wikimedia Commons/SA-kuva

This puts the question of greatness into perspective. Both planes evolved continuously during their long careers, and any attempt at an answer will have to include a reference to the timeframe in question. There is no doubt that the post-war Griffon-powered Spitfires in the form of the land-based F.Mk. 24 and the carrier-based F.Mk 47 were the all-out finest fighters, as the development of the Messerschmitt had (almost) ended by that time. During the late-war years the Spitfire also held the edge, with the Mk IX being a finer plane than the Bf 109G/K, which were starting to show signs of the airframe not being able to absorb the vast increases in power while maintaining the fine handling in the same way the Spitfire could. During the early war years, the question is harder to answer. The Bf 109F ‘Fredrich’ probably held a slight edge over contemporary Spitfires when it came out, especially over the North African desert, were the Messerschmitt’s dust covers hampered its performance less than the corresponding items on the Spitfire. During the battle of Britain, it is impossible to pick one over the other. The Bf 109E had heavier armament, and a slightly higher top speed, but the thin wing discouraged pilots from taking the aircraft ‘to the limit’ in dogfights, as overstressing the wings could have fatal consequences. In capable hands, both aircraft could more than hold their own against any aerial adversaries.

Still, the final word would go to the Messerschmitt, and in a very unlikely way.

After the war, the Czechoslovak aircraft industry had to find a way to supply the country’s reborn air force with fighters. As the Bf 109G had been produced in the country during the German occupation, it was a natural choice. The ‘new’ fighter was named Avia S-99, but after only a minor batch had been delivered, a warehouse fire destroyed the stored stocks of DB 605 engines. A new engine had to be found if production was to continue. This was solved when it was decided to mate the Jumo 211F engine and propeller used by the Heinkel He 111 to the airframe of the Bf 109G, a decision based more on availability than any finer points of engineering.

The resulting aircraft, dubbed the Avia S-199, was probably the worst version of the whole Bf 109-family to reach production. The large paddle-bladed propeller caused a huge amount of torque, making the aircraft extremely difficult to handle on take-off and landing. The layout of the Jumo-engine also meant that the fearsome 30 mm cannon that had been firing through the propeller hub on the Bf 109 G/K had to be discarded. All in all, it would most probably have slipped off into the pages of aviation history largely unnoticed, if not for developments in the middle east.

An Israeli S-199 showing its huge propeller and redesigned engine cowl. Source: Wikimedia Commons

Upon Israel’s declaration of independence in May 1948, the country faced a massive attack from all sides by neighboring Arab states. One of the major problems was that the young state lacked any kind of combat aircraft, and due to an arms embargo, acquiring them proved difficult. Czechoslovakia was eager for any influx of dollars it could find, and was willing to part with a number of S-199’s. The aircrafts enjoyed a brief but eventful career in Israeli service, sporting an extremely high accident rate, but also scoring the first kills of the new air force when Mordechai “Modi” Alon, squadron commander of the sole Israeli fighter unit at that time, managed to shoot down two converted C-47 transport planes that were bombing Tel Aviv (Alon would later die in a non-combat accident with the S-199). However, of the (circa) seven kills attributed to the Avia in Israeli hands, at least one is confirmed as being a Royal Egyptian Air Force Spitfire. In a weird twist of irony, the Messerschmitt won the last of countless of duels. And it did this flown by a Jewish pilot, who had shot down two Bf 109’s while flying for the US Army Air Force during the Second World War.

Epilogue:

There was yet another chapter in the story of the Bf 109. During the latter part of the war, Spain had secured license production rights of the Bf 109G from Germany, but they too found that the DB 605 where not available. In this case, the Germans desperately needed all available engines for themselves. For their homebuilt HA-1109 they therefore used French-made Hispano-Suiza 12Z, but soon a need for more power (and less torque) was evident. Although the plane was outdated as a fighter by this time, the Spanish Air Force decided that an improved version could be useful in counter-insurgency operations in their North African colonies. Thus was born the final version of the Bf 109, the dedicated ground-attack HA-1112-M1L “Buchon” of 1954-vintage, fitted with a, you guessed it, Rolls-Royce Merlin engine.

The story of the unfortunate Capital Ship Bomb and the squadron that delivered it

Youngest and most famous of the RAF’s operational frontline squadrons, No. 617 ‘Dambusters’ recently ended their last operational mission with the Panavia Tornado when they returned home from Afghanistan last week. The story of the Dambusters is well known, how the squadron was set up with hand-picked crews to perform a special mission with a weapon tailor-made for the purpose. What is less well known is the history of their immediate predecessor, No. 106 Squadron, and especially its C Flight.

No. 106 Squadron first appeared in 1917 as a reconnaissance squadron, serving in Ireland during the troubles until it was disbanded.  In 1938 it was reformed, and by the time it traded its Manchesters for Lancasters in 1942 its C Flight was regarded as the most accurate unit in the whole No. 5 Group. Guy Gibbson served as the Squadron Commander.

This is where the special missions came into the picture. The problem of how to put the heavy German surface units out of action occupied quite a lot of time and resources from both the RN and the RAF during the war. While Coastal Command had noticed that harbor raids with torpedoes could potentially damage or sink even the heaviest capital ships, they were extremely hazardous. Bomber Command, on the other hand, operated from a safer altitude, but the bombs did little damage to the heavy armored decks of the battleships and heavy cruisers. The Capital Ship Bomb promised to solve the issue. It was designed to, when dropped from a high enough altitude, penetrate the armored decking, after which it would detonate and send a heavy carbon-steel plate through the bottom of the ship.

Photograph taken from one of the RAF bombers taking part in a raid on Brest in 1941. Gneisenau and Scharnhorst are seen in the drydocks in the middle part of the picture, with Prinz Eugen in the lower part. Source: Wikimedia Commons/IWM

The Capital Ship Bomb had been in development for two years, before it was felt that it was ready for use. For its day, it was very large, and originally it was intended that the Manchester would carry it, as it was the only British bomber in service with a uninterrupted bomb-bay large enough. However, as the Manchester proved to be plagued by engine problems, a modified Lancaster seemed the obvious choice. Thus the so called Lancaster ‘Provisioning’ with bulged bomb-bay doors was born, and the best unit available was chosen to carry out the first raid on Gdynia and the half-finished carrier Graf Zeppelin. The battleship Gneisenau was also present, but was apparently only a secondary target.

On the night of 27th/28th of August 1942 four of C Flight’s Lancasters took off with a single CSB each. Guy Gibbson flew the lead plane himself, but it was to no avail. The bombs, with the large round disc in the front, proved to be almost impossible to aim accurately, and all missed their target. Instead of embarking upon a radical redesign of the shape to make it more streamlined, the whole project was more or less abandoned. The first raid also proved to be the last for the weapon.

There was however no shadow cast upon the squadron. A new special mission followed, with No. 106 being responsible for the introduction of the 8 000 lbs (3 600 kg) HC-bomb (or ‘Super Cookie’, as it was called) into service. The weapon was the heaviest bomb produced at that point, but the squadron proved that it could even be brought over the Alps, when in late 1942 they struck targets in northern Italy with it.

Loading a ‘Super Cookie’ into the bomb-bay of a Lancaster. Source: Wikimedia Commons/IWM

By this time, the famous bouncing bombs were starting to mature, and it was decided to split C Flight from its parent unit to better be able to proceed with preparations for the dambusting raid in total secrecy. C Flight became No. 617 Squadron, and, as they say, the rest is history.

No. 106 Squadron continued to serve with some distinction as a ‘regular’ bomber squadron until the end of the war, when it was disbanded a second time in 1946. In 1959 it was reactivated yet again, this time as a RAF Strategic Missile squadron, equipped with the PGM-17 Thor IRBM. In 1963, with the removal of Thor from the British arsenal, No. 106(SM) Squadron was disbanded for the third and final time.

PGM-17 Thor in RAF service. Source: Wikimedia Commons/RAF